Automated Login for Remote Desktop Mobile
Remote Desktop Mobile autologin
As you may know, Remote Desktop Mobile (RDM) does not support auto-login. But sometimes you may want a user does not change settings and is directly connected to a Terminal Server. Ruggedized devices are often used in warehouses and the IT structure uses a terminal server to gather data and manage goods. Although I think Windows Mobile is not the right OS for such barcode scanner devices, you may have no choose and have to use a handheld computer with Windows Mobile instead one that uses Windows CE. The RDM or Terminal Service Client provided with Windows CE devices is much more flexible and can be configured by the OEM to enable you to auto-login into a Terminla Server (TS).
OK, the challenge was to automate the startup and login of RDM on a Windows Mobile 6.1 device. I started using embedded Visual C++ 4.0 although this is outdated by VS2005 and VS2008.
The idea was to launch the exe, fill in the values and click the Connect bar.
Finding the connect dialog window
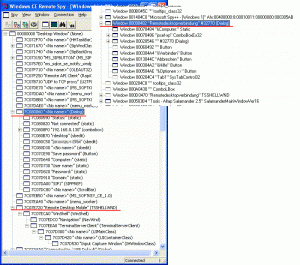
Normally, on desktop windows, windows and there childs are located in there own tree (see desktop PC spy++ screenshot). On WM61 I found, that the RDM window (class=”TSSHELLWND”) and the Connect dialog (class=”Dialog”) are located side by side below the desktop window (see cespy screenshot). This makes it hard to find the right dialog, especially as the Connect Dialog does not have a unique window title (window text). The windows can be identified as belonging together by there processID.
Filling the fields
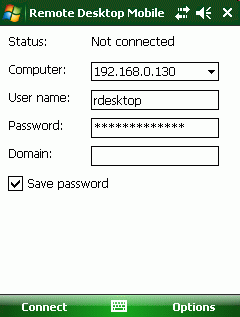
Knowing the right window I was able to set the text entries by knowing there controlIDs (dialogs use ctrlIDs for easier access of the data, see scanTscDialog() in tscDialog.cpp). So the tool I did can fill in all connection details using SetWindowText().
Execute the Connect
The fields are filled with the connection details and now I needed a way to simulate a click onto the connect button (which is a menu in reality) to let the dialog execute a connect. I tried several approaches, the best is to use keyb_event although it works also by sending the TSC window the WM_USER message that is posted by the menu click. I found this WM_USER message within messages of cespy as I tapped on [Connect].
 //Solution three, best solution, ensure you use the scancode value too! AFAIK the scancode for F1 is always 0x70
keybd_event(VK_F1, 0x70, 0, 0);
 Sleep(30);
 keybd_event(VK_F1, 0x70, KEYEVENTF_KEYUP, 0);
I was unable to send TSSHELLWND nor the Dialog a click onto the menu option [Connect]. The menu seems to be not owned by either of these two visible windows. The menu bar looks like owned by the desktop window.
Sending the SoftKey1 (F1) was also unsuccessfull for window handles of TSSHELLWND and the Connect Dialog.
The pitfalls
Everything seems to work OK, but sometimes the tool was unable to fill the fields and execute the connect. I did search several hours and then I found, that the registry and a file is involved in the connect.
The tool always failed to autoconnect after the first clean boot. So I did a snapshot with the famous free SSNAP by “S-K tools” and found the changes that caused a manualy connect to be successfull.
Registry changes
First, the registry will get be changed, if you manually connect. As I did not like to have my tool to emulate a user typing into the fields using keybd_event, I added code, that does the same changes to the registry (see writeMRU() function in code). There are some more changes in registry, but fortunately I did not have to implement these too (see comments in “tscDialog.cpp”).
RDP file default.rdp
When you fill the connect dialog and then press [Connect] RDM will save your values in a file \Windows\default.rdp. You may know, that rdp files are commonly used on desktop windows to save/load Remote Desktop Session connection data. Yes, WM6.1 does use a similar technique.
The tool had to provide a default.rdp with the data of the connection settings. So I wrote a function to create and write this file from scratch on every start (see writeRDP() in tsc_dialog.cpp and rdp_file.h). As options, like “FullScreen” or “Fit to Screen” are also controlled by the rdp file, I was able to control these settings by code.
Conclusion
So far the tool works. Dont download if you dont like spaghetti. The code is written as grown.
Usage
Write the correct values for the connection to the registry
[HKEY_LOCAL_MACHINE\Software\RDP_autologin]
"FitToScreen"="1"
"FullScreen"="1"
"Status"="connecting..."
"Save Password"="1"
"Domain"=""
"Password"="xxxxxxxxxx"
"Username"="rdesktop"
"Computer"="192.168.0.130"
Then simply start the tool. First it will terminate a running instance of RDM. Then it starts a new instance and starts to fill the fields and do the connect.
Warranty
No warranty, code is provided as is. Hopefully it is usefull for the one or other.
Changes
Some values are hard coded, ie the control IDs used. These IDs may be different on other devices or within other RDM releases. So far the code works on my testing device. If you need to change the control IDs you may use the scanTscDialog() function to get the actual codes listed in the debug window.
Have fun!
[Download not found] [Download not found]


 http://www.led-mg.de