Archive for the ‘Tips’ Category.

Create Watchface with Zepp Editor for Amazfit

How to prepare and test a Zepp watchface

Done with Amazfit GTR 2E

Before you start, you need a lot of files prepared:

  • A background image to be used as watchface
  • A hour, minute and second dial, if you create an analog watchface
  • Digits and symbols to be used, for example the digits 0-9, a period, a percent, a ‘°C’, a distance unit (km) and others as you like to place on your watch face.

The background watchface for the GTR2E is 454×454 pixels. You need to know, how to do precise pixel images. The hands have to be symmetric, so they can easily rotate.

The digits can be created one by one using your favorite painting tool (i.e. Paint.Net, Inkscape or Painter or even GIMP). Another option is to use fontforge or the fontimage tool (Linux only) or a fontforge python script. Imagemagick is also useful if you need to invert or make the images transparent.

Fontimage example

Create a small text in white with transparent (black) background from Comic Sans Bold Truetype font:

fontimage --pixelsize 22 --text "km" -o km_comicsans1.png ComicSansMSBold.ttf
-or-
fontimage --pixelsize 22 --text "°C" -o gradCelsius_comicsans1.png ComicSansMSBold.ttf

Then invert the image (using imagemagick convert):

convert km_comicsans1.png -negate km_comicsans_n.png
-or-
convert gradCelsius_comicsans1.png -negate gradCelsius_comicsans_n.png

Finally make the black background transparent:

convert km_comicsans_n.png -transparent black km_comicsans.png
-or-
convert gradCelsius_comicsans_n.png -transparent black gradCelsius_comicsans.png

Another example for a bash script to generate digits:

#!/bin/sh
for n in 0 1 2 3 4 5 6 7 8 9 '.' ':' '%' '°C' 'km'
do
  fontimage --pixelsize 22 --text $n -o $n_1.png "ComicSansMSBold.ttf"
  convert $n_1.png -negate $n_n.png
  convert $n_n.png -transparent black $n.png
done

In the above script 22 is the pixel size of the images and ComicSansMSBold.ttf is the font to be used.

If you need to create more, single bitmaps at once, you may use a fontforge python script. I used to first load the font to be used into Fontforge and change the Encoding to Latin-1, mark the first 127 chars, invert the selection and delete the rest. Then save this as a Fontforge font file for later use.

Now you can use a small python script and export the remaining glyphs to single bitmap files:

import os
from fontforge import *

font = open(os.sys.argv[1])
font.reencode("iso8859-1")
for glyph in font:
  if font[glyph].isWorthOutputting():
    if glyph.isupper():
      name = glyph + "_capital"
    else:
      name = font[glyph].glyphname
      # or name it with ' + "_" + str(font[glyph].unicode)' added
      print ("glyph: " + glyph + ", unicode: " + str(font[glyph].unicode) + ", name: " + name + "\n")
      font[glyph].export("c:/temp/" + name + ".png", 22)

If you do not want to start this from command line, you may replace ‘os.sys.argv[1]’ by the path and name of your saved Fontforge font file or a TrueType font file. Be warned that you get many bitmap files now. Possibly do that within an empty new directory.

Now that you have your images ready, go on and start a watchface.

Assemble the Watchface

Continue reading ‘Create Watchface with Zepp Editor for Amazfit’ »

adsbox, dump1090 piaware flightaware flightradar24 and IPv6

Recently I switched by flight tracker Bananapi M2 Zero with RTLSDR from adsbox (port 7070) to dump1090 (port 8080). But then, the IPv6 official address does not open the web site any more, although I switched the port forarding from 7070 to 8080 on the router.

After some digging and tests, I found that lighttpd, that was used as web server by dump1090-fa (fligh-warae variant), does not default to use IPv6 too. I had to change the dump1090-fa extension for lighttpd to:

/etc/lighttpd/conf-enabled/89-dump1090-fa.conf

...# Listen on port 8080 and serve the map there, too.
$SERVER["socket"] == ":8080" {
  server.use-ipv6 = "enable"
  alias.url += (
    "/data/" => "/run/dump1090-fa/",
    "/" => "/usr/share/dump1090-fa/html/"
  )
}
...

Now,  netstat -tulpn did show that port 80 and 8080 are open for ipv4 and ipv6

...
tcp        0      0 0.0.0.0:80              0.0.0.0:*               LISTEN      -                   
...
tcp6       0      0 :::8080                 :::*                    LISTEN      -

Just to remember.

Openvpn server an Deutsche Glasfaser IPv6 only Router und feste-ip.net

OpenVPN auf BananaPi M2 Zero W mit Raspbian

Deutsche Glasfaser Genexis Router in Verbindung mit feste-ip.net zur Umsetzung ipv4 nach ipv6

Ich versuche hier meine Installation basierend auf den nachfolgenden Quellen zusammenzufassen.

Quellen: https://wiki.ubuntuusers.de/OpenVPN/ und https://blog.sengotta.net/openvpn-server-am-unitymedia-ds-lite-anschluss-betreiben/

Nachfolgend sind persönliche Angaben in < und > gesetzt. IP Addressen sind in der Form durch x ersetzt.

Feste-ip.net Universal Portmapper einrichten

Über https://test-ipv6.com/ die öffentliche IP6 Adresse des Servers (VPN Gateway) ermitteln.

Feste-IP.net Portmapper

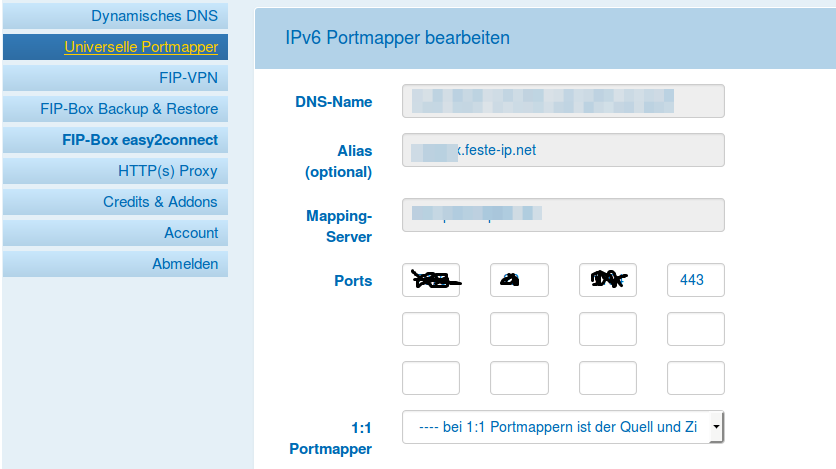
Bei feste-ip.net habe ich eine Port Weiterleitung auf die öffentliche IPv6 Addresse des BananaPi (dem OpenVPN Server) und den Port 443 unter “Universelle Portmapper” angelegt.

Ich habe hier den Port 443 gewählt da dieser auch in vielen Fremdnetzen (zb Mobilfunk Netze) funktioniert. Der Standard VPN Port 1194 ist möglicherweise in dem einen oder anderen Netz gesperrt.

Ich habe einen Alias gewählt den ich mir leichter merken kann als den DNS-Namen. Ausserdem laufen auf demselben BananaPi M2 Zero W noch drei weitere Dienste. Diese sind über den gleichen Alias unter drei anderen Ports erreichbar.

In der Client.conf muss später der Alias Name und der gemapte Port angegeben werden, da die Verbindung nicht über IPv6 und Port 443 hergestellt wird. Siehe client.con Zeile:

remote <aliasname>.feste-ip.net <auf 443 umgeleiterter port>

Openvpn Server einrichten

Continue reading ‘Openvpn server an Deutsche Glasfaser IPv6 only Router und feste-ip.net’ »

Convert / Mogrify slow, try epeg

Recently I had a set of images to resize from 8000×10000 pixels down to 2048 pixels maximum. As previously I started with mogrify (mogrify -sample ‘2048>x2048>’ -monitor *.jpg) but it was terrible slow and slowed down my netbook to be totally unusable. Crap….

I looked for alternatives and found epeg. Download and compiled from https://github.com/mattes/epeg. After fetching libjpeg-dev and libexif-dev, it compiled without error. Finally needed to do ldconfig.

It was lightning fast and did not slow down my netbook (1GHz, 1GB, atom2 proc.). Unfortunately I had to convert file by file (i.e. epeg -v -w=2048 -h=2048 –max=2048 -p image01.jpg image01_.jpg), but that was done from a script.

If you ever look for fastest resizing give epeg a chance.